
Что такое oVirt
oVirt – это решение распределенной виртуализации с открытым исходным кодом, предназначенное для управления всей корпоративной инфраструктурой. oVirt использует доверенный гипервизор KVM и построен на нескольких других проектах сообщества, включая libvirt, Gluster, PatternFly и Ansible.
Он был основан Red Hat как проект сообщества, на котором основана виртуализация Red Hat Enterprise.
Он позволяет централизованно управлять виртуальными машинами, вычислительными ресурсами, хранилищами и сетевыми ресурсами из простого в использовании веб-интерфейса с независимым от платформы доступом.
KVM на архитектуре x86-64 и PPC – единственные поддерживаемые гипервизоры, но в будущих выпусках предпринимаются усилия по поддержке архитектуры ARM.
Процесс установки пакетов движка oVirt
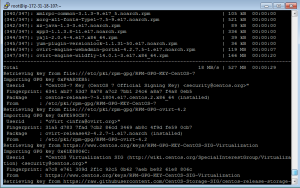
Сначала добавьте репозиторий oVirt в Centos 7, используя команду ниже.
yum install http://resources.ovirt.org/pub/yum-repo/ovirt-release42.rpm
yum update -y
Теперь выполните следующую команду, чтобы установить пакет и зависимости ovirt-engine.
yum install ovirt-engine -y
Настройка oVirt
engine-setup
# engine-setup
[ INFO  ] Stage: Initializing
[ INFO  ] Stage: Environment setup
          Configuration files: ['/etc/ovirt-engine-setup.conf.d/10-packaging-jboss.conf', '/etc/ovirt-engine-setup.conf.d/10-packaging.conf']
          Log file: /var/log/ovirt-engine/setup/ovirt-engine-setup-20190102113015-mptgj3.log
          Version: otopi-1.7.8 (otopi-1.7.8-1.el7)
[ INFO  ] Stage: Environment packages setup
[ INFO  ] Stage: Programs detection
[ INFO  ] Stage: Environment setup
[ INFO  ] Stage: Environment customization

          --== PRODUCT OPTIONS ==--

          Configure Engine on this host (Yes, No) [Yes]: yes
          Configure ovirt-provider-ovn (Yes, No) [Yes]: yes
          Configure Image I/O Proxy on this host (Yes, No) [Yes]: yes
          Configure WebSocket Proxy on this host (Yes, No) [Yes]: yes

          * Please note * : Data Warehouse is required for the engine.
          If you choose to not configure it on this host, you have to configure
          it on a remote host, and then configure the engine on this host so
          that it can access the database of the remote Data Warehouse host.
          Configure Data Warehouse on this host (Yes, No) [Yes]: yes
          Configure VM Console Proxy on this host (Yes, No) [Yes]: yes

          --== PACKAGES ==--

[ INFO  ] Checking for product updates...
[ INFO  ] No product updates found

          --== NETWORK CONFIGURATION ==--

          Host fully qualified DNS name of this server [hackthesec]:
[WARNING] Host name hackthesec has no domain suffix
[WARNING] Failed to resolve hackthesec using DNS, it can be resolved only locally
[WARNING] Host name hackthesec has no domain suffix
[WARNING] Host name hackthesec has no domain suffix
[WARNING] Host name hackthesec has no domain suffix

          --== DATABASE CONFIGURATION ==--

          Where is the DWH database located? (Local, Remote) [Local]:
          Setup can configure the local postgresql server automatically for the DWH to run. This may conflict with existing applications.
          Would you like Setup to automatically configure postgresql and create DWH database, or prefer to perform that manually? (Automatic, Manual) [Automatic]:
          Where is the Engine database located? (Local, Remote) [Local]:
          Setup can configure the local postgresql server automatically for the engine to run. This may conflict with existing applications.
          Would you like Setup to automatically configure postgresql and create Engine database, or prefer to perform that manually? (Automatic, Manual) [Automatic]:

          --== OVIRT ENGINE CONFIGURATION ==--

          Engine admin password:
          Confirm engine admin password:
[WARNING] Password is weak: it is too short
          Use weak password? (Yes, No) [No]: yes
          Application mode (Virt, Gluster, Both) [Both]: Both
          Use default credentials (admin@internal) for ovirt-provider-ovn (Yes, No) [Yes]: yes

          --== STORAGE CONFIGURATION ==--

          Default SAN wipe after delete (Yes, No) [No]: No

          --== PKI CONFIGURATION ==--

          Organization name for certificate [Test]:

          --== APACHE CONFIGURATION ==--

          Setup can configure the default page of the web server to present the application home page. This may conflict with existing applications.
          Do you wish to set the application as the default page of the web server? (Yes, No) [Yes]: yes
          Setup can configure apache to use SSL using a certificate issued from the internal CA.
          Do you wish Setup to configure that, or prefer to perform that manually? (Automatic, Manual) [Automatic]:

          --== SYSTEM CONFIGURATION ==--


          --== MISC CONFIGURATION ==--

          Please choose Data Warehouse sampling scale:
          (1) Basic
          (2) Full
          (1, 2)[1]: 1

          --== END OF CONFIGURATION ==--

[ INFO  ] Stage: Setup validation
[WARNING] Warning: Not enough memory is available on the host. Minimum requirement is 4096MB, and 16384MB is recommended.
          Do you want Setup to continue, with amount of memory less than recommended? (Yes, No) [No]: yes

          --== CONFIGURATION PREVIEW ==--

          Application mode                        : both
          Default SAN wipe after delete           : False
          Update Firewall                         : False
          Host FQDN                               : hackthesec
          Configure local Engine database         : True
          Set application as default page         : True
          Configure Apache SSL                    : True
          Engine database secured connection      : False
          Engine database user name               : engine
          Engine database name                    : engine
          Engine database host                    : localhost
          Engine database port                    : 5432
          Engine database host name validation    : False
          Engine installation                     : True
          PKI organization                        : Test
          Set up ovirt-provider-ovn               : True
          Configure WebSocket Proxy               : True
          DWH installation                        : True
          DWH database host                       : localhost
          DWH database port                       : 5432
          Configure local DWH database            : True
          Configure Image I/O Proxy               : True
          Configure VMConsole Proxy               : True

          Please confirm installation settings (OK, Cancel) [OK]: OK
[ INFO  ] Stage: Transaction setup
[ INFO  ] Stopping engine service
[ INFO  ] Stopping ovirt-fence-kdump-listener service
[ INFO  ] Stopping dwh service
[ INFO  ] Stopping Image I/O Proxy service
[ INFO  ] Stopping vmconsole-proxy service
[ INFO  ] Stopping websocket-proxy service
[ INFO  ] Stage: Misc configuration
[ INFO  ] Stage: Package installation
[ INFO  ] Stage: Misc configuration
[ INFO  ] Upgrading CA
[ INFO  ] Initializing PostgreSQL
[ INFO  ] Creating PostgreSQL 'engine' database
[ INFO  ] Configuring PostgreSQL
[ INFO  ] Creating PostgreSQL 'ovirt_engine_history' database
[ INFO  ] Configuring PostgreSQL
[ INFO  ] Creating CA
[ INFO  ] Creating/refreshing DWH database schema
[ INFO  ] Configuring Image I/O Proxy
[ INFO  ] Setting up ovirt-vmconsole proxy helper PKI artifacts
[ INFO  ] Setting up ovirt-vmconsole SSH PKI artifacts
[ INFO  ] Configuring WebSocket Proxy
[ INFO  ] Creating/refreshing Engine database schema
[ INFO  ] Creating/refreshing Engine 'internal' domain database schema
[ INFO  ] Creating default mac pool range
[ INFO  ] Adding default OVN provider to database
[ INFO  ] Adding OVN provider secret to database
[ INFO  ] Setting a password for internal user admin
[ INFO  ] Generating post install configuration file '/etc/ovirt-engine-setup.conf.d/20-setup-ovirt-post.conf'
[ INFO  ] Stage: Transaction commit
[ INFO  ] Stage: Closing up
[ INFO  ] Starting engine service
[ INFO  ] Starting dwh service
[ INFO  ] Restarting ovirt-vmconsole proxy service

          --== SUMMARY ==--

[ INFO  ] Restarting httpd
          In order to configure firewalld, copy the files from
              /etc/ovirt-engine/firewalld to /etc/firewalld/services
              and execute the following commands:
              firewall-cmd --permanent --add-service ovirt-postgres
              firewall-cmd --permanent --add-service ovirt-https
              firewall-cmd --permanent --add-service ovn-central-firewall-service
              firewall-cmd --permanent --add-service ovirt-fence-kdump-listener
              firewall-cmd --permanent --add-service ovirt-imageio-proxy
              firewall-cmd --permanent --add-service ovirt-websocket-proxy
              firewall-cmd --permanent --add-service ovirt-http
              firewall-cmd --permanent --add-service ovirt-vmconsole-proxy
              firewall-cmd --permanent --add-service ovirt-provider-ovn
              firewall-cmd --reload
          The following network ports should be opened:
              tcp:2222
              tcp:35357
              tcp:443
              tcp:5432
              tcp:54323
              tcp:6100
              tcp:6641
              tcp:6642
              tcp:80
              tcp:9696
              udp:7410
          An example of the required configuration for iptables can be found at:
              /etc/ovirt-engine/iptables.example
          Please use the user 'admin@internal' and password specified in order to login
          Web access is enabled at:
              http://hackthesec:80/ovirt-engine
              https://hackthesec:443/ovirt-engine
          Internal CA 18:E6:C2:E8:91:62:B1:66:96:6A:89:0F:2E:E7:BF:01:10:C8:D61
          SSH fingerprint: SHA256:sMTFaRt94ic/+LT3ASGtj4Fla3qK7zSNSEXbvgkzObI
[WARNING] Warning: Not enough memory is available on the host. Minimum requirement is 4096MB, and 16384MB is recommended.

          --== END OF SUMMARY ==--

[ INFO  ] Stage: Clean up
          Log file is located at /var/log/ovirt-engine/setup/ovirt-engine-setup-20190102113015-mptgj3.log
[ INFO  ] Generating answer file '/var/lib/ovirt-engine/setup/answers/20190102113350-setup.conf'
[ INFO  ] Stage: Pre-termination
[ INFO  ] Stage: Termination
[ INFO  ] Execution of setup completed successfully
Настройка брандмауэра
Для доступа к веб-интерфейсу управления oVirt необходимо открыть порты HTTP и HTTPS с помощью следующих команд.
# firewall-cmd --add-service=http --permanent
# firewall-cmd --add-service=https --permanent
# firewall-cmd --reload
Теперь вы можете получить доступ к интерфейсу управления oVirt
используя ваш IP-адрес – https://192.168.1.1


Приветствую!
При запуске engine-setup настройка прерывается ошибкой
Failed to execute stage ‘Environment setup’: Cannot connect to Engine database using existing credentials: engine@localhost:5432
Подскажите, куда можно копнуть?
Приветствую ! Это весь вывод?